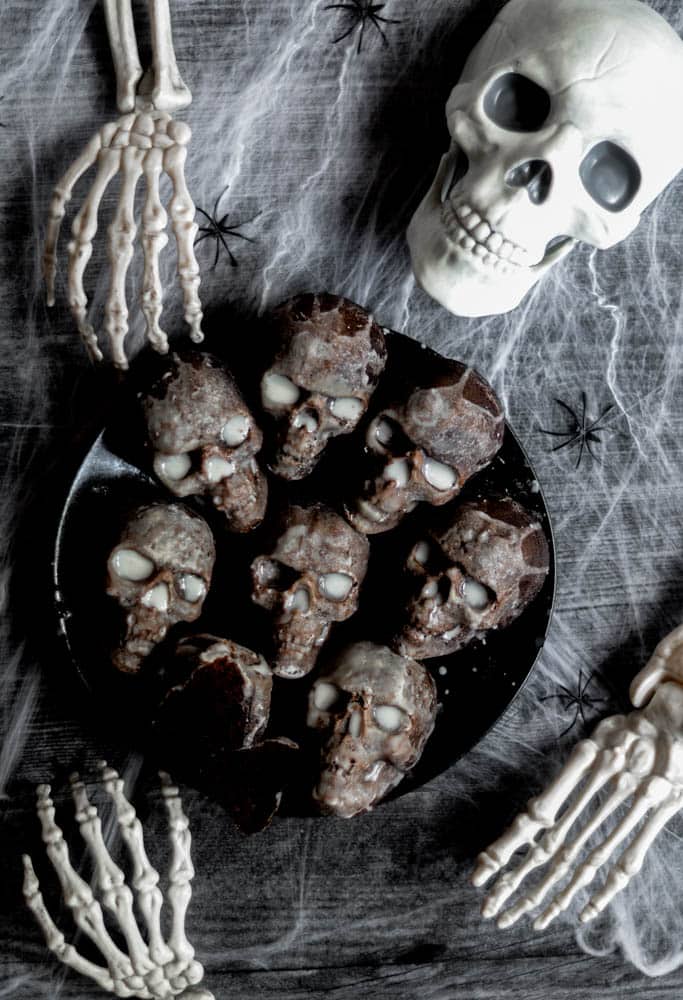
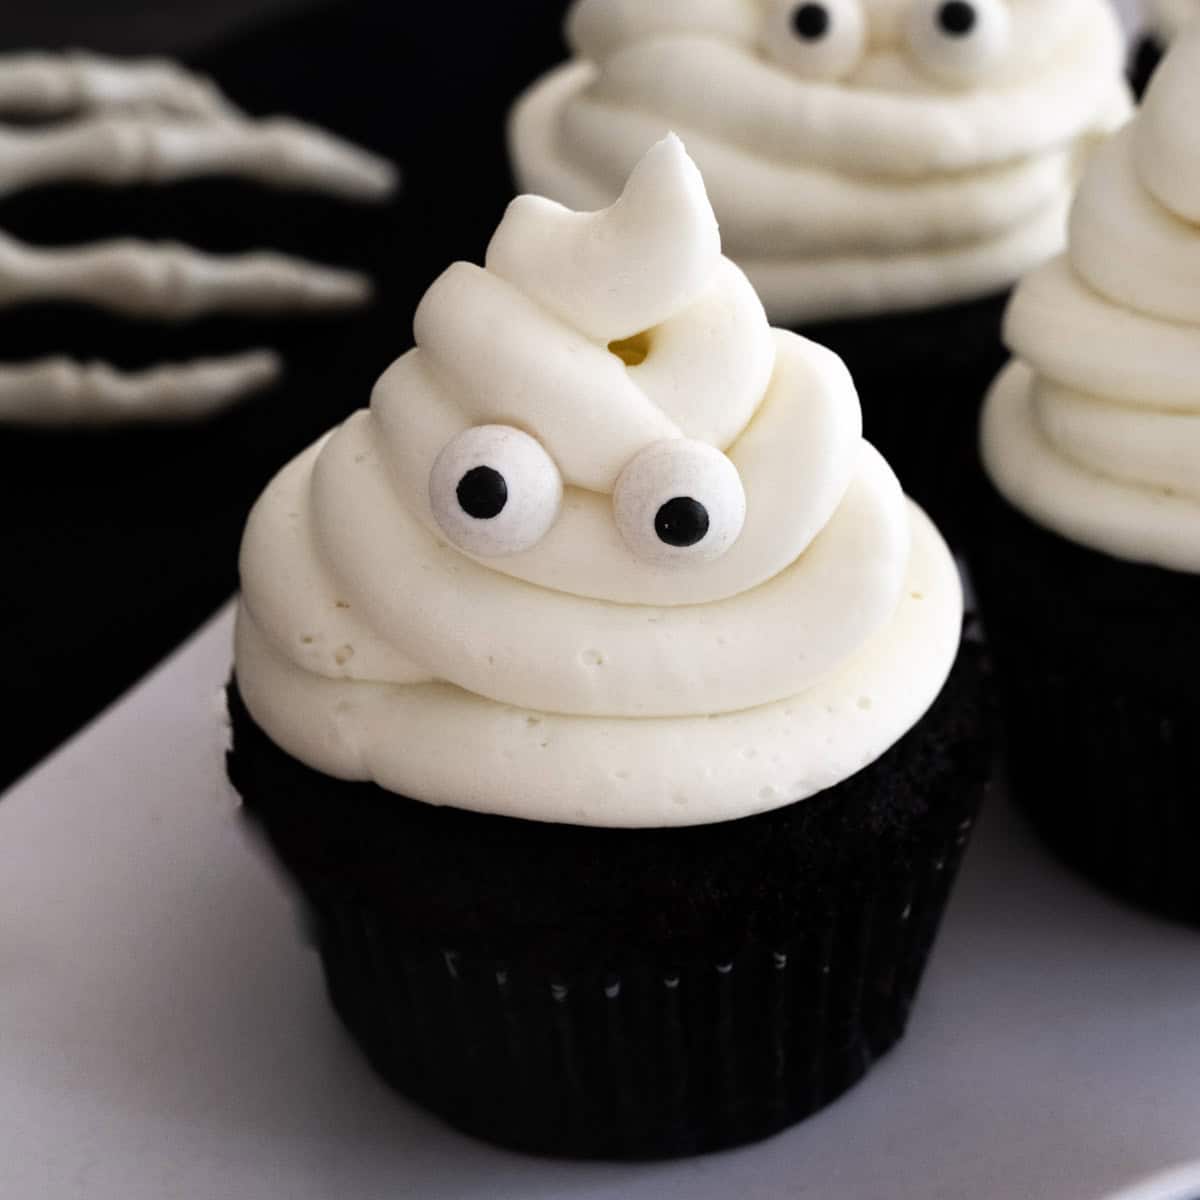
With a moist chocolate cake and simple glaze, these mini skull cakes are super spooky for any Halloween celebration.
If you would have told me in March that this junk would still be going on come Halloween, I think I would have definitely cried. Thinking about the holidays not being celebrated "as normal" would've been a huge blow to me early on. Not that I am happy we're not celebrating like normal now, but I've come to understand this junk will be with us for awhile. I had to change my attitude about how I was thinking about the future. The kids are happy. We can still celebrate. We can still interact with others despite keeping our distance. The future is uncertain but this is all temporary. Let's stay the course, stay healthy, and focus on the things we can control.
And talk about celebrating! Whoa doggie! We've been celebrating all week. I think I'm way more excited about this Halloween than in years past because I've been so intimately involved with every detail to make this holiday special, whereas most years there's a lot of events we attend that are already planned for us (school parties, parades, trick-or-treating, birthday parties...).
The whole idea for these skull cakes started because we've been learning all about the human body, especially our skeletal system, in Mommy Homeschool. We then made a large skull cake for our neighbor's birthday. Loved the cake recipe and was obsessed with how spooky the glaze made the cake but didn't love how hard it was to put together. The halves were so heavy that there was no amount of ganache that was going to glue the two pieces together evenly. I needed a smaller, more manageable pan to make for Halloween.
Want to Save This Recipe?
Enter your email below, and I'll send it to you. Plus, you'll get delicious new recipes from me!
By submitting this form, you consent to receive emails from Worn Slap Out
Hello to the Spookiest Mini Skull Pan Ever
I really don't encourage y'all to buy much of anything because I truly believe in a minimalist kitchen, but these mini skulls are so cute and the mini skull cakelet pan is such good quality. I AM IN LOVE. IN LOVE. This is not sponsored, but Nordic Ware always has high-quality ish. Yes, you're paying a decent amount for the pan, but it'll last far beyond the pandemic for many more Halloween celebrations.
The cakes aren't terribly mini (the skulls are almost 6" long) -- so even thought this recipe makes 12 skulls (2 batches), you'll likely have people that will want to split one.
To prepare the pan for the batter, make sure you spray AND flour the pan. This will ensure the skulls come out without any issue. The flour also creates a marbley, spooky effect when it gets into the crevices even without the glaze.
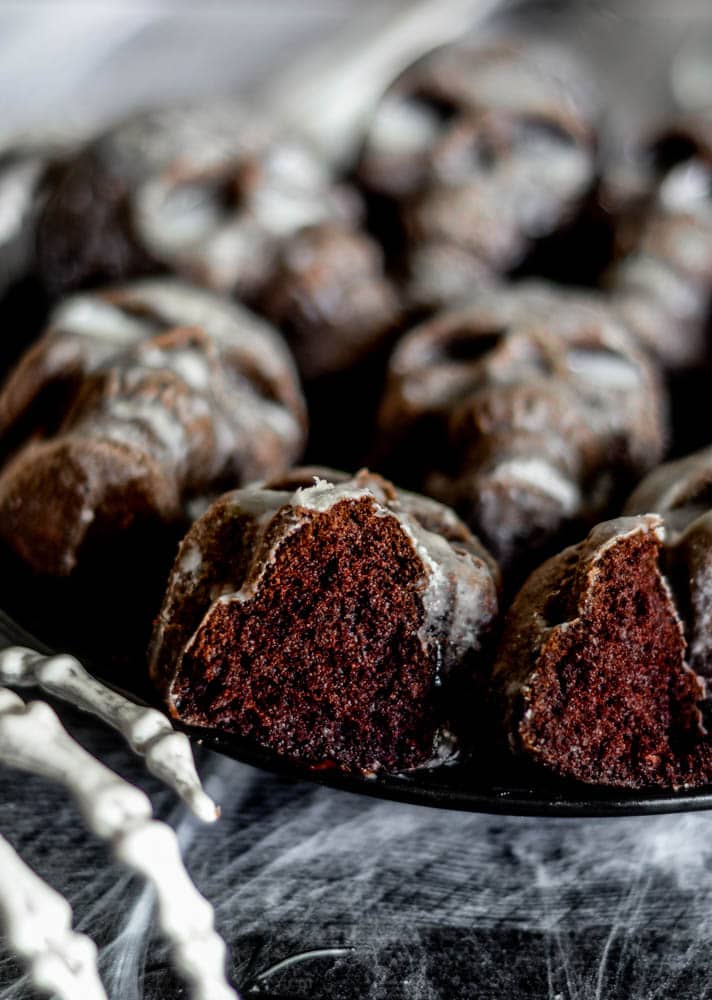
A Moist, Rich Chocolate Cake
The cake is similar to my chocolate bundt cake -- but slightly less dense. The cake doesn't rise as much either -- hence why you need to fill the skull cavities about 90% full. If you want to take a shortcut and use boxed cake mix, you probably could (though I haven't tried it). just fill the cavities about ¾ full because the boxed cake mix rises much more.
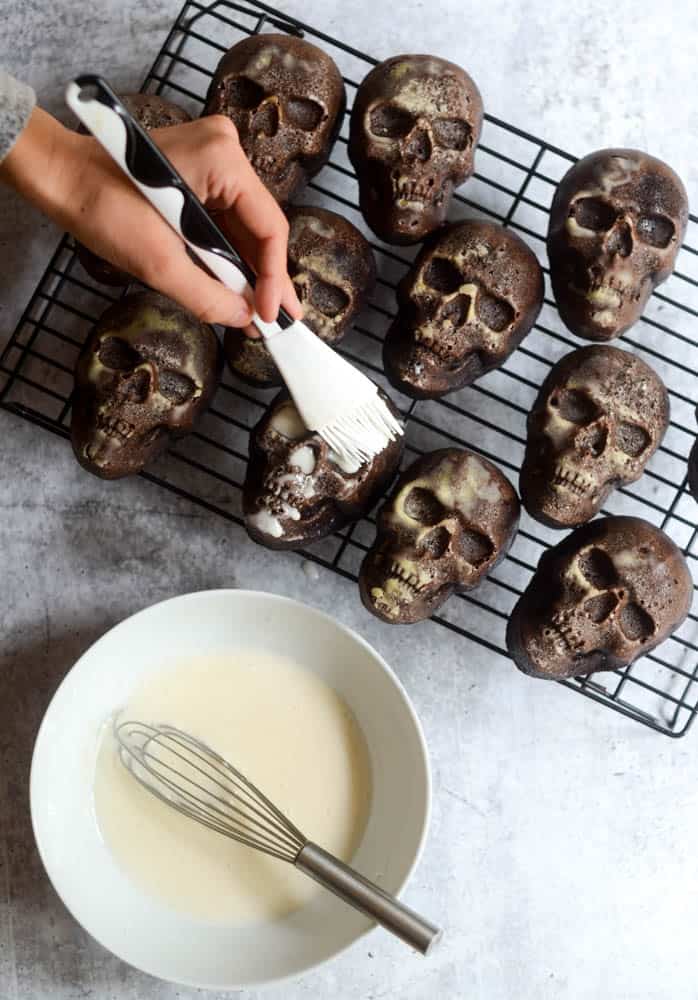
The Moment of Truth: Removing the Skulls from the Pan
Removing the skulls from the pan is really easy -- especially because you've also sprayed and floured the pan. My secret to remove the cake is to set the timer for 10 minutes from the moment the cake comes out of the oven to the moment you flip the pan over. It's just enough time to have the skulls cool down without giving them too much time to set (and then stick to the pan).

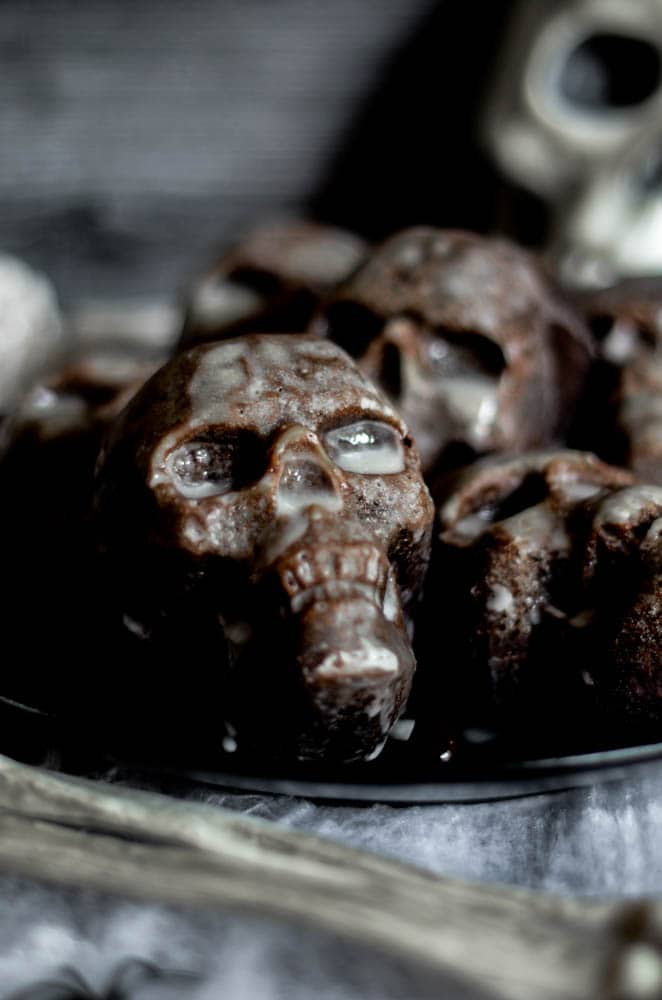
The Spooky Glaze
The powdered sugar glaze gets into all of the intricate crevices of the mold (those teeth!), making the skulls have this eery old-and-dead feeling to them. The glaze could not be easier. You need three ingredients that are whisked together:
- powdered sugar
- milk
- vanilla extract
If you have clear vanilla extract, use that. If not, it's really not worth buying some. Regular vanilla extract gives the glaze a teeny tiny brown hue, but it's not a big deal. I used regular pure vanilla extract here, and I am happy with the results.
Happy, safe Halloween!
xox,
kathryn

Mini Chocolate Skull Cakes
Ingredients
For the chocolate cake:
- 1 ½ cups unsalted butter (3 sticks)
- ⅔ cup cocoa powder
- 1 teaspoon salt
- 1 ½ cups water
- 3 cups all-purpose flour
- 2 ½ cups granulated sugar
- 2 teaspoons baking soda
- 3 large eggs
- ¾ cup sour cream
- 1 teaspoon vanilla extract
For the glaze:
- 1 ½ cups confectioners' sugar
- 3 tablespoons milk
- ½ teaspoon pure vanilla extract*
Instructions
- Preheat oven to 350Ëš F. Spray skull cake pan with non-stick cooking spray and flour well. Set aside.
- In a small sauce pan, whisk the butter, cocoa powder, salt, and water over medium heat until butter is melted. Remove from the heat and set aside.
- In a large bowl, whisk together the flour, sugar, and baking soda. Slowly add the chocolate mixture into the flour mixture while whisking. When batter is too thick, switch to a spoon. Add eggs, sour cream, and vanilla extract and mix until combined.
- Fill skull cavities about 90% full (cake won't rise a huge amount). Bake for about 25 minutes or until a toothpick inserted into the middle of a skull comes out clean. Let skulls cool completely (about an hour) before glazing.
- For the glaze, whisk together confectioner's sugar, milk, and vanilla extract in a small bowl. Generously brush glaze on cooled cakes and do a second or even third coat until the skulls are well coated (some of the glaze will be absorbed by the cake). Enjoy!
Notes
Nutrition
As an Amazon Associate I earn from qualifying purchases. This comes at no charge to you. Thanks for supporting Worn Slap Out!
Dena Garcia says
I made these mini skull chocolate cakes for a Halloween party this past weekend. Everyone loved them! They were moist and delicious! The glaze was the perfect amount of sweet! I will be making them for all kinds of occasion! Thanks!
Kathryn says
Yay, Dena! I'm so glad everyone loved them. We made them again this year, too -- and they are ALWAYS a hit!
Kasey says
These came out beautifully, and my family demanded more! I found that the cakes did rise a good amount, but that worked out well, since I opted to trim the bottom (which is the top when they’re in the oven) so that the finished skulls would sit flat. These are absolutely delicious, and I appreciate the simple, straightforward recipe. Happy Halloween!
Kathryn says
I'm so happy you loved these, too, Kasey! I'm glad you saw the note about them not rising much. It's a very dense cake so you have to fill the cavities up to about 90%! Thanks for leaving a comment!
Kate says
Super simple recipe and it is so good! The cake does rise a little but even filled 90% so I filled my 2nd batch at about 80% and baked for 20 minutes. Will definitely make make these again! So cute and tasty!!
Kathryn says
Hi Kate! I'm so glad this worked out and you loved it! I love seeing reviews like this. Thanks for making my day!
Kim says
Hi, I have the Nordic 6 Skull pan - would this recipe work for that pan as well? Also, I want to put a filling inside to up the creep factor. Do you think cutting a small hole in the back of them, adding in some strawberry glaze and then replacing the cake I cut out would work? Thank you!
Kathryn says
Hi Kim! I love this idea. Yes -- the cake is dense enough that you could easily poke a hole in the back and add some filling. Let me know how it turns out!
Catalina says
Is it possible to use boxed cake mix for these?
Kathryn says
You can -- just don't fill the cavities as much because the cake will rise more!
Lisa says
I actually have the full size skull pan, would I need to double this recipe you think? You lil guys came out beautifully, btw!!! I have been trying different recipes for this pan since I got 8 or so years ago, saw yours and thought it sounded really nice, thanks!!!
Kathryn says
Thanks so much, Lisa. I have the big one, too! The big skull is very top-heavy, so I put a lot of icing down to help the skull stand up properly. I'd double the recipe...and you'd probably need to use 3/4 of it. You can use the rest for cupcakes! Let me know how it turns out!
Leigh says
These came out great. I used my mini skull pan and cooked them for 12 minutes. So cool.
Kathryn says
I'm so glad, Leigh! Thanks for sharing!
Brittney says
I followed the recipe exactly and my cakes fell apart. The finished cakes were not dense enough to stay in the shape of the pan and just crumbled.
Kathryn says
I'm so sorry, Brittney. I don't know how this could have happened because the batter is quite dense. I hope you'll give the recipe another try next year.
Kathy says
Was a complete bust. Cake was too fluffy and didn’t come out of the pan in one piece despite following directions to a tee.
Kathryn says
I'm so sorry to hear this, Kathy. I just made these again this year and had no problem. You can't be shy about greasing and flouring your pan though!
Nate says
really love the flavor of these guys, unfortunately, the cake sorta fell apart when trying to remove from the mold, and break down easily even just being moved around. I used the lodge skull pan, and not sure what I did wrong? the teeth in particular only formed on maybe 2 skulls 🙁
Kathryn says
Oh no! I wonder why that might be the case. Maybe add a generous bit of cooking spray and more flour? I have never had a problem with this before, so I wonder if it's the pan.
Jane says
Just made these skull cakes and I used a red icing to give them a blood splattered spooky look
Kathryn says
Oooooh how fun! Love the blood splattered spooky look, too!
Jacquie says
I made these and they came out great. I read someone say that they used a red splatter. Love that idea. I am making a
Them today as a trial and will definitely make them for my Halloween party. Quick question, could I make the skulls, double wrap and freeze them without the icing and then take them out in advance and then ice them like the day before?
Kathryn says
Yep, absolutely that would work!
Candace says
I’m not sure what is different about the recipe that you have posted and what you are making but these cake’s absolutely rise quite a bit. Actually mine (filled 90%) are at least an inch or 2 raised out of the pan. My batter was not dense at all but more like a regular cake batter and I followed the recipe exactly. Smells amazing but I am concerned about these cakes coming out without falling apart even with a well oiled and floured pan. Wish I was able to post a picture so you could see what I mean. Maybe it’s something I did wrong.
Kathryn says
Hmm...that's odd. If they puffed more than expected, you can always just cut off the backs of the skull so they lie flat. Mine have never risen that much.
R. A. Yaniv says
It may be possible that the lady whose cake-lets rose out of the pan might have used the baking powder, instead of the baking soda. It is a common accident when people decant items into jars. And even when items are in their original containers…I have seen people go on auto-pilot and use the wrong chemical even when there is a note on the recipe stating that the product will turn turquoise if baking powder is used instead of baking soda. If cooking with distractions around one, using the wrong size spoon can also cause issues. I sometimes have to get my husband to leave the kitchen so that I can focus (He comes in to show me cat videos. He now has a limit of 3 per day.).
On a different topic, but a similar theme…you can get “black†cocoa powder. It definitely is blacker that regular when baked into a product. The milk chocolate chips used are way lighter than the batter! One caveat on the use of “black†cocoa powder though is that you will need to used baking powder with it, since the “black†cocoa powder’s ph will _not_ work with baking soda. Substituting baking powder for baking soda requires tripling the amount. So if this recipe calls for 2 teaspoons baking soda, then you would use 2 tablespoons baking powder. Usually the rule of thumb is 1-1.5 teaspoons of baking powder per 1 cup of flour. This recipe uses 3 cups of flour so that would be anywhere from 1 tablespoon to 1.5 tablespoons. I would go with 1.5 tablespoons for this recipe rather than 2 so that it is denser based on this information.
Kathryn says
All great ideas. Thanks so much for sharing!
Pat A. says
Really moist recipe and triple brushing with the glaze was perfect. Mine rose well above the pan at 90% fill, but the shaved off scraps did not go to waste—you could make cake balls from them, in fact! Great recipe.
Kathryn says
Awesome to hear, Pat! Thanks so much!
<3,
Kathryn
Yanise says
Delicious! Everyone at a recent Halloween party loved these, thank you!! My only note is that I had the same issues as many others- they fell apart on their way out of the pan. I recommend filling them at 70% capacity or less. Otherwise, Kathryn, maybe you can list the ingredients by weight as well?
Kathryn says
Hi Yanise! I played around with reducing the batter amount to about 75% this weekend, and I think that's probably the right call. I'll update the recipe card accordingly! Thanks so much for making them and your feedback!
<3,
Kathryn
Pat A. says
Really moist cake recipe and 3 layers of the glaze was perfect in terms of look and ratio to cake. They rose higher than expected, so I’ll adjust and get more cakelets out of this with the same ingredients. I’m making them for the 2nd time in 2 weeks. Well done!
Kathryn says
Love this, Pat! So glad you enjoyed these spooky treats!
<3,
Kathryn
Pat says
This is just an excellent cake recipe. Any thoughts on how to adjust this for a standard 2-layer cake? Thank you.
Kathryn says
Hi Pat! I think it would hold up well as a standard 2-layer cake actually! I haven't tried it myself, but don't see why it wouldn't work. Now you have me thinking I need to test this soon... 🙂
<3, Kathryn