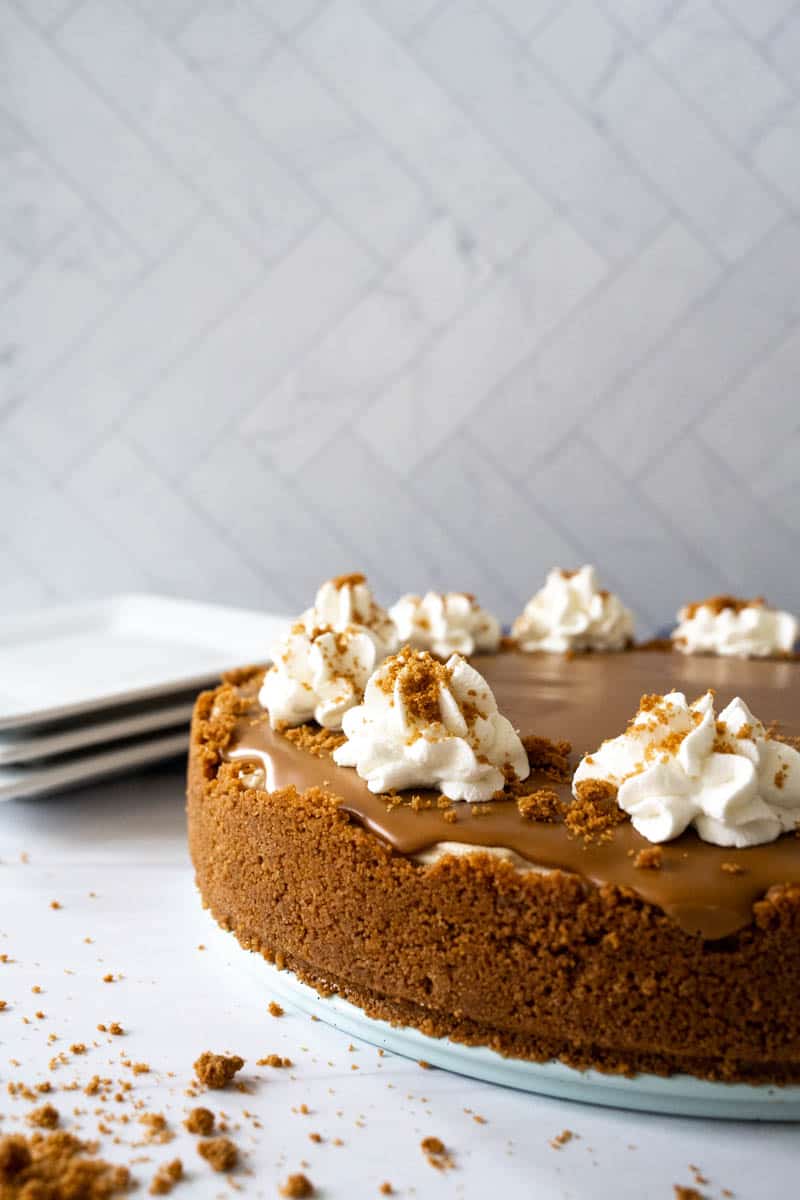
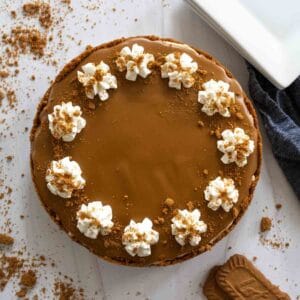
This heavenly No-Bake Biscoff Cheesecake will transport your taste buds to cloud nine. With a crunchy Biscoff cookie crust, a creamy and fluffy filling infused with Biscoff cookie butter, and a luscious Biscoff spread topping, this cheesecake is a guaranteed crowd-pleaser.
Worn Slap Out, LLC is a participant in the Amazon Services LLC Associates Program, an affiliate advertising program. As an Amazon Associate, I earn from qualifying purchases. Each of your purchases via Amazon links supports Worn Slap Out at no additional cost to you.
Every time I fly, I get so geeked out that humans can go into a small metal tube, be blasted into the sky above the clouds, and land all the way across the world. The concept of flying is just so crazy to me. Am I alone in this? I hope not.
Air travel has sure changed in my lifetime. I remember by dad dropping me off right at the jetway to hop my first solo flight to visit my best friend in West Palm Beach. I remember airlines used to serve meals on longer flights for everyone. I remember the days you didn't have to pay more for more legroom, more luggage, exit rows, etc. And while so many things have changed, one thing that remains constant is my love for Biscoff cookies.
Want to Save This Recipe?
Enter your email below, and I'll send it to you. Plus, you'll get delicious new recipes from me!
By submitting this form, you consent to receive emails from Worn Slap Out
Why You'll Love This Cheesecake
- The perfect dessert to make ahead. This cheesecake is best made the day before you are serving it. It needs quite a bit of time to set in the refrigerator since it is no-bake!
- Uses minimal ingredients...only 8 ingredients! All of the ingredients are easily found in a grocery store, too. This cheesecake also requires no eggs.
- Requires zero baking! This no bake cheesecake is rich and creamy without ever having to be baked.
- She's purdy. The cheesecake looks beautiful when it comes out -- and that extra top layer of cookie butter is just to-die for!
Lotus Biscoff Cookies: The Official Cookie of the Airlines
These cookies have been a staple on the airlines for quite some time. What makes Biscoff cookies specifically chosen for air travel? Well, it turns out that they tick all the boxes for the perfect airborne treat.
Their individually wrapped packets make them convenient and hygienic, ensuring freshness and preserving their delightful crunch. Also, Biscoff cookies are nut-free, which makes the cookies ideal for a wide range of passengers with dietary restrictions. Who knew!
Ingredients & Equipment You'll Need
The ingredient list is pretty minimal for this cheesecake! You'll need:
- Biscoff cookies (plus some to garnish if you'd like)
- unsalted butter
- cream cheese (get full fat cream cheese)
- granulated sugar
- sour cream
- heavy whipping cream
- Biscoff cookie butter spread (see FAQ below to learn more)
- powdered sugar

As for equipment, you need some good bowls, a hand mixer or a stand mixer, and a springform pan.
How to Make Biscoff Cheesecake: A Step-by-Step Guide
I've taken my No Bake Strawberry Cheesecake recipe and altered the filling to include Biscoff cookie butter to not only get the caramelized goodness of Biscoff in the crust, but in the filling and in the top layer as well. Every bite will have all the notes of these cookies.
Let's dive into the steps and indulge in the decadent world of Biscoff!
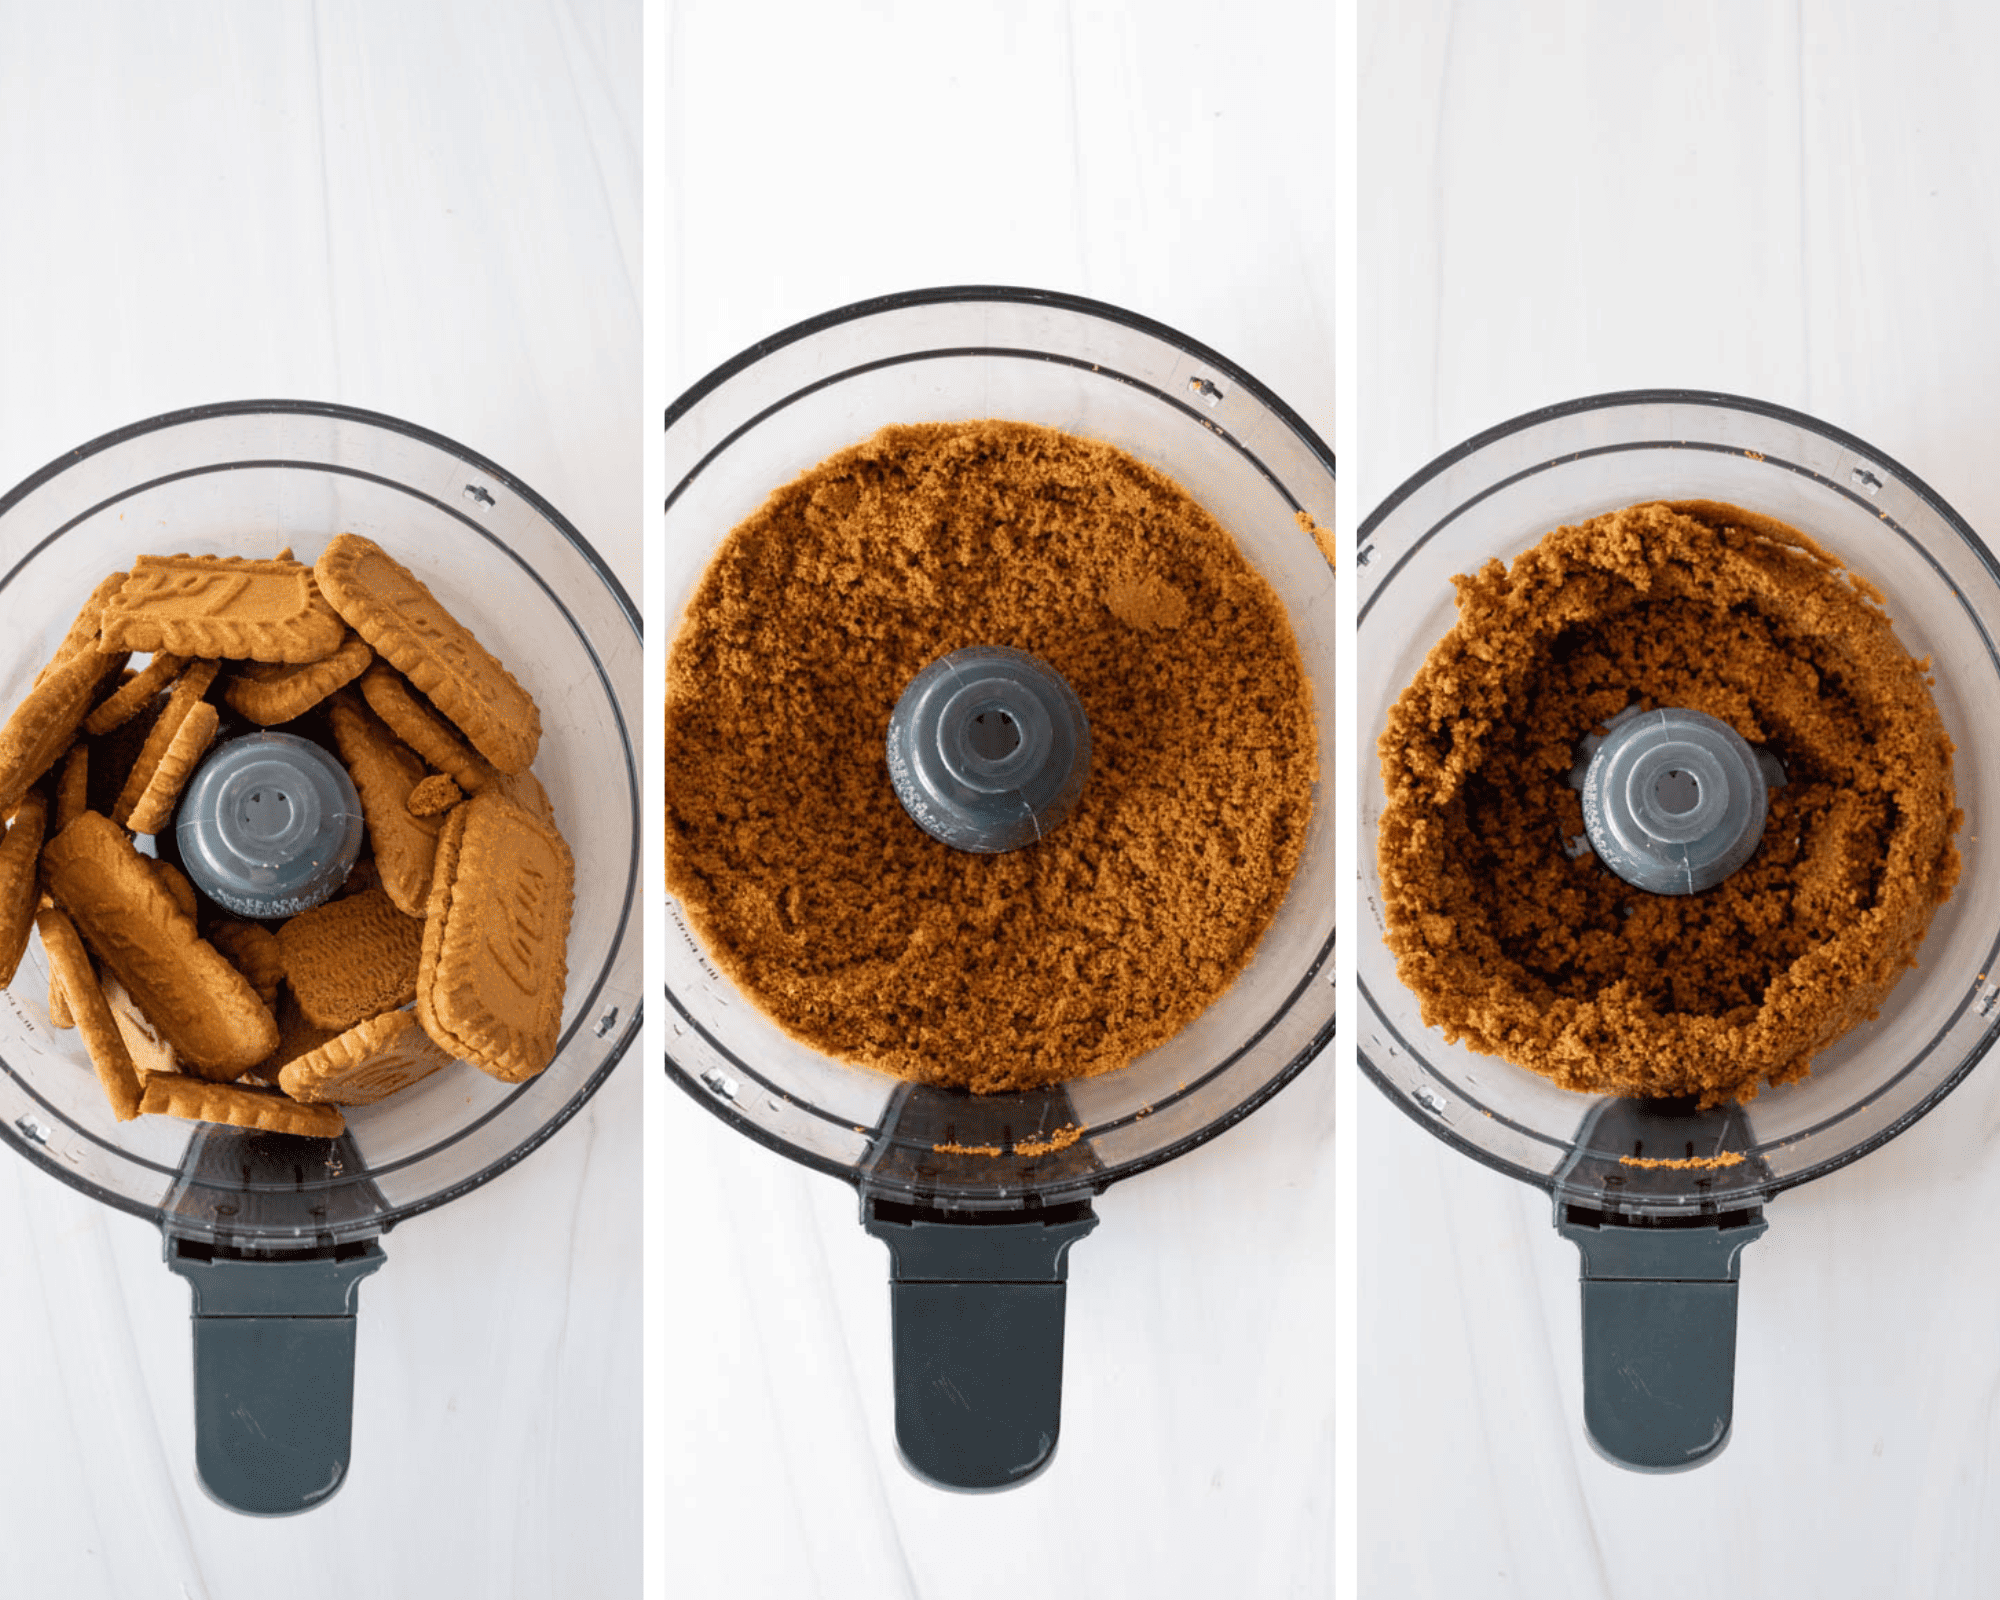
Step 1: Prepare the crust
Place the cookies in a food processor and pulse until the cookies crumble. Add melted butter until it feels like sand. Pour the mixture into the springform pan, pressing it onto the bottom and about 1" up the sides of the pan. Place in the freezer for about 20 minutes to firm up.
Step 2: Prepare the filling
Whip cream cheese and granulated sugar in a stand mixer until it becomes light and fluffy (#1 in picture below). Add the sour cream and set aside (picture #2). In a separate bowl, whip the heavy cream until stiff peaks form (picture #3). Gently fold the whipped cream into the cream cheese mixture (picture #4), being careful not to stir so you maintain a fluffy texture.
Step 3: Pour filling into crust & refrigerate
Remove the crust from the freezer and pour the mixture into it (picture #5), smoothing the top using a offset spatula for an even layer (picture #6). Please the cheesecake in the refrigerator to cool for 5-6 hours or overnight.

Step 4: Prepare top layer of cookie butter
Microwave the Biscoff cookie spread until melted. You want it to be slightly warm so it moves easily but not hot where it will melt your cheesecake. Pour the cookie butter over the cheesecake, spreading it evenly. Return the cheesecake to the refrigerator to firm up for about 30 minutes.
Step 5: Decorate, garnish, and serve!
Whip up heavy whipping cream until peaks start to form. Slowly add the powdered sugar and continue beating until stiff peaks form. Transfer the whipped cream to a pastry bag fitted with your favorite tip, and pipe onto the cheesecake. Garnish with some Biscoff cookie crumbles, then enjoy!

Shortcuts When You're Worn Slap Out
There aren't a ton of shortcuts with this cheesecake TBH. I know...that's a rareity. Consider garnishing with just whole Biscoff cookies arranged in a circular pattern on top of the cheesecake if you don't have time to make another batch of whipped cream. This is already decently simple.
Storage Information
- To store: Leftovers should be stored in a container in the refrigerator. The leftover slices will be good for about 5 days.
- To freeze: Place the cheesecake in a container and place in the refrigerator for up to 3 months.
Other Useful Tips
- With the exception of the heavy whipping cream, you'll have a smoother, creamier filling if you start with all of your ingredients at room temperature.
- You can't over beat your cream cheese and sugar. Make sure you whip a lot of air into this mixture at the very beginning. This will make your cheesecake thicker instead of flat.

Frequently Asked Questions
In 1932, Jan Boone, Sr. developed the cookie and named it Lotus, after the flower. Just as lotus flowers represent purity, the original cookies only contained natural ingredients.
Biscoff is a combination of biscuit and coffee -- meaning you better go make yourself some coffee right now and savea few cookies to be eaten, too! Hence, why some people refer to the cookie as a Lotus Biscoff cookie to represent both names.
I'm guessing you could substitute for vegan ingredients, but I have never tried it myself, so I can't guarantee it'll work.
I bought mine at our local Safeway. It's the most annoying grocery store that never seems to have anything, but they have Biscoff cookies in the cookie aisle and the cookie spread/butter near the peanut butter.
It's a crunchy cookie that has some caramel notes, along with cinnamon, ginger, and nutmeg. It's closer to a gingersnap than anything but with less ginger and more caramel notes.
No, the crust keeps all of the filling where it needs to be. This is not a good cheesecake to do crustless.

Try These Desserts
Homemade Chocolate Pudding Pie
Chocolate Espresso Silk Pie with Oreo Crust
No Bake Chocolate Pomegranate Tart

Happy travels this summer!
xox,
kathryn
Biscoff Cheesecake
Ingredients
For the crust
- 1 250 gram package Biscoff cookies crushed
- 6 tablespoons unsalted butter melted
For the filling
- 24 oz. cream cheese softened to room temperature
- ¼ cup granulated sugar
- ¾ cup Biscoff cookie butter spread
- ¼ cup sour cream
- 1 cup heavy whipping cream
For the top layer
- ¾ cup Biscoff spread melted
- ½ cup heavy whipping cream
- 1 Tablespoon powdered sugar
Instructions
- Place Biscoff cookies in a food processor. Pulse until cookies turn into crumbles. Add melted butter and pulse until mixture feels sandy. (You can also do this by hand by placing in a plastic bag and mashing with something heavy). Pour crumbs into an 8" or 9" springform pan and press crumbs onto the bottom and 1" up the sides of the pan. Place in freezer for about 20 minutes.
- Meanwhile, in a stand mixer with paddle attachment, mix cream cheese and sugar together until light and fluffy (about 3-5 minutes...you can't over mix this). Add in sour cream and Biscoff cookie spread until just combined. Place bowl aside.
- In another bowl, beat whipping cream until still peaks form. Gently fold whipping cream into cream cheese mixture with a spatula until combined (don't just fix because you want to keep it light and fluffy). Pour filling into crust and smooth out the top. Place in the refrigerator to cool for 5-6 hours or overnight.
- Once set, melt Biscoff cookie spread in the microwave and pour over the top of the cheesecake (you want spread to be melted but not hot). Place back int he refrigerator to firm up, about 30 minutes.
- With a whisk attachment, beat whipping cream until it starts to thicken. Add powdered sugar and mix until stiff peaks form. Add whipped cream to a pastry bag with a favorite tip and pipe on the cheesecake. Alternatively, you could garnish with extra Biscoff cookies.
Notes
- To store: Leftovers should be stored in a container in the refrigerator. The leftover slices will be good for about 5 days
- To freeze: Place the cheesecake in a container and place in the refrigerator for up to 3 months.
Ieva says
Great recipe! We love and make biscoff cheesecake often, but this was the first time I made it with sour cream, and we loved it. Adds a very subtle tang that we all enjoyed! Overall, great texture and flavour!
Kathryn says
I'm so glad you liked it, Leva! The sour cream really does add a bit of extra richness and tang!
Katherine says
My family are huge Biscoff fans, so they all loved this cheesecake!
Kathryn says
I'm so glad, Katherine! Thanks so much for coming to leave feedback!
Dannii says
This was the perfect cheesecake. Such an amazing biscoff flavour.
Dina and Bruce says
I can't even describe how much everyone loved this dessert!!!!! The flavor was just amazing!!
Kathryn says
Thanks so much! <3